First Aid
Purpose:
To introduce the fundamentals of first aid
- Four lifesaving steps
- Recognition, treatment and prevention of hot and cold weather injuries
FIRST AID FUNDAMENTALS
Definition: First aid is emergency treatment of the sick and injured until qualified medical help is available.
Purpose: To save lives, prevent further injury, and reduce pain.
Vital life signs: Check an injured person's PULSE and RESPIRATION to determine if still alive.
EVALUATE THE CASUALTY
1. Check for responsiveness
2. Check for breathing
3. Check for bleeding
4. Treat for shock
FOUR LIFESAVING MEASURES
a. Restore breathing
b. Stop the bleeding
c. Protect the wound
d. Prevent shock
RESTORE BREATHING
Two methods to restore breathing
1. Head Tilt -Chin Lift (HTCL) Technique
2. Jaw Thrust Technique
HTCL TECHNIQUE
Place victim on back with head in chin up position.
While head tilted back, use two fingers of other hand to lift chin forward.
JAW THRUST TECHNIQUE
Used when neck injury suspected.
Kneel at victim's head, placing your thumbs on each side of the jaw. Then take the fingers of both hands, and place under the victim's chin. Lift up with fingers and thumbs at same time.
ARTIFICIAL RESPIRATION
Note: If the victim does not begin breathing after the airway is opened, you must begin artificial respiration.
RESUSCITATION:
Mouth - to - mouth
or
Mouth - to - nose
ARTIFICIAL RESUSCITATION
1. Check victim for a response. If none, you or someone should call 911.
2. Place victim on his or her back.
3. Use "HTCL" method to align airway.
4. Pinch victim's nose. With free hand place index and second fingers on bony part of chin. Push forward on chin so tongue does not block airway.
5. Take a deep breath and create seal over victim's mouth. Blow forcefully into mouth until chest rises.
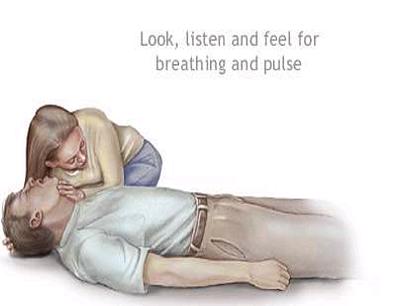
6. After giving two full breaths, look, listen, and feel.
7. Give another full breath, start count,1001, 1002, 1003, 1004, 1005.
8. Continue breaths, once every five seconds or 12 per minute.
9. Be sure exhalation is complete. Continue until victim begins to breathe on own, or until relieved by medical personnel.
MOUTH-TO-NOSE
- Used when mouth-to-mouth not possible.
- Done like mouth-to-mouth but blow into victim's nose while mouth closed. Allow mouth to be open for exhalation.
- FOR BREATHING RESTORATION ONLY!
OPEN WOUNDS
- The open wound is the most common condition requiring first aid.
- You must act immediately to prevent the loss of blood. 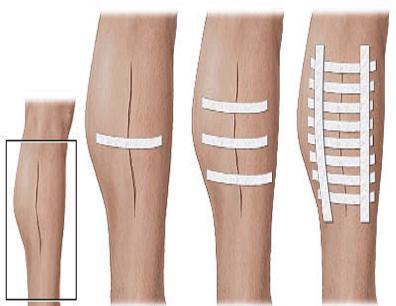
2. STOP THE BLEEDING
- Three primary methods, in order:
1. Direct pressure
2. Pressure points
3. Tourniquet
DIRECT PRESSURE
- Place sterile/clean dressing over wound
- Exert firm, even pressure with palm of hand
- If bleeding is moderately severe, continue pressure for five to ten minutes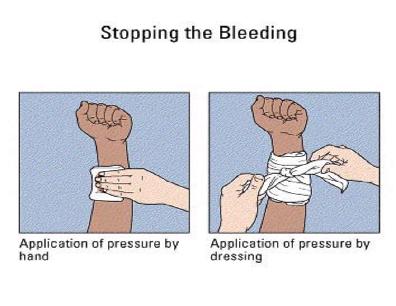
Controls bleeding by compressing blood vessels and reducing blood flow.
Helps hold blood in wound until clotting occurs.
After 5 - 10 minutes can replace pressure from hands by tying ends of sterile dressing around wound.
PRESSURE POINTS
- Exists within blood vessels near the surface and in the vicinity of a bone
- Use thumb or fingers to press vessel against bone
- Use with direct pressure. You must ensure the limb is elevated above the heart.
TOURNIQUET
USED AS A LAST RESORT WHEN THE CHOICE IS LIFE OR LIMB!
Used if bleeding from arm or leg wound does not slow considerably within minutes after pressure applied and wound elevated.
APPLYING A TOURNIQUET
a. Place tourniquet between wound and heart, tourniquet band 1 to 2 inches wide.
b. Tighten tourniquet just enough to shut off blood flow so that injured limb is pale and yellowish with no pulse below tourniquet. 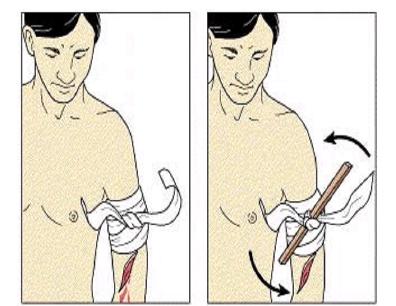
c. Leaving tourniquet exposed and visible, dress exposed wound. Mark victim's head with a "T" and time tourniquet applied, leaving note if possible.
d. ONLY MEDICAL PERSONNEL can remove a tourniquet, or victim may go into SHOCK.
PROTECT THE WOUND
ALL wounds are considered contaminated due to germs on skin, in air and clothes.
Any instrument that causes a wound, can also push germs into the wound.
1. DO NOT attempt to clean the wound.
2. Prevent infection with sterile/clean dressing.
3. Dressing prevents more germs from getting into wound and stops loss of body fluids or further damage to skin.
PREVENT SHOCK
Shock may occur from any type of injury.
Generally, the more serious the injury, the more serious the shock.
SYMPTOMS OF SHOCK
a. Eyes vacant and lackluster. Pupils enlarged.
b. Breathing shallow, irregular, and labored.
c. Face, arms, and legs may feel cold to touch. Sweating likely. Skin pale and gray.
d. Pulse weak but rapid.
e. Casualty may vomit or attempt to spew.
f. Casualty may be disoriented or stuporous.
TREATMENT FOR SHOCK
a. Keep victim calm. Talk to victim and provide reassurance that you can help.
b. Keep victim comfortable and warm to help body regain normal circulation.
c. If victim conscious, place on back and elevate feet 6 to 8 inches above head (shock position). DO NOT place victim in this position if head injury or chest wound.
d. Relieve pain as best as possible.
HEAT ILLNESS:
3 TYPES
HEAT EXHAUSTION
HEAT STROKE
HEAT CRAMPS
HEAT EXHAUSTION:
CAUSE
- Caused by loss of water and salts. High temperatures, humidity, and solar heat are important factors.
SYMPTOMS
- Profuse sweating
- Cool, pale, moist skin
- Possible headaches and muscle cramps
- Possible shortness of breath and dizziness
TREATMENT
- Pour water over victim to initiate cooling
- Move to cool place and loosen clothing
- Treat for shock and seek medical assistance
HEAT STROKE:
CAUSE
- Exposure to high temperatures coupled with a loss of the ability to sweat
SYMPTOMS
- Lack of sweating
- Dizziness, mental confusion, headaches
- High body temperature, hot red dry skin
- Possible collapse
TREATMENT
- “ YOU MUST REDUCE BODY TEMPERATURE!”
- Move victim into shade
- Remove clothing and douse with cold water
- Fan casualty
NOTE FOR HEAT STROKE:
It may be difficult for non-medical personnel to recognize heat stroke and heat exhaustion. A rectal temperature should be taken to determine the seriousness of the illness. Primary goal is to rapidly cool the victim.
HEAT CRAMPS:
CAUSE
- Insufficient salt in the body.
SYMPTOMS
- Painful cramps in abdominal wall and extremities
- Wet skin and extreme thirst
TREATMENT
- Move casualty to shaded area
- Have casualty drink at least one full canteen of water; loosen clothing
- Seek medical help if cramps continue
NOTE ON HEAT STRESS:
Heat stress casualties can occur at any time of the year. Alcohol causes dehydration and can contribute to heat stress. AVOID ALCOHOL two days prior to an activity.
PREVENTING HEAT CASUALTIES
a. Acclimatization: a gradual breaking-in period with progressive physical exertion and heat exposure.
b. Water and salt intake: Drink 8 to 12 canteens of water per 24 hours, two canteens after evening chow and before taps. Salt tablets ARE NOT a preventive measure.
c. Rest, sleep, and recreation. You need eight hours of sleep per night. Recreation is in the form of liberty and outdoor activities.
d. Proper wearing of clothing. Clothes should be loose-fitting. Males should wear covers to protect from sunburn. All should use sunscreen.
e. Proper instruction. This type of class is required by Marine Corps Order. It is given periodically to all Marines.
COLD WEATHER INJURIES
Two types are hypothermia and frostbite
HYPOTHERMIA:
DEFINITION
- A severe chilling or dangerous lowering of the entire body temperature. Body heat is lost faster than it is produced.
- Caused by immersion in cold water or exposure to cold air.
SYMPTOMS
- Several stages of discomfort and impairment
- First symptom is shivering, disorientation, and slow thinking
- Pulse faint or difficult to detect
- If body temperature around 90 F, victim may be drowsy, mentally slow, stiff and uncoordinated
- If temperature below 90 F, body cannot shiver. Victim goes into shock; glassy eyes, slow, shallow breathing, weak or absent pulse; may lose consciousness.
ADVANCED STAGES
At a core body temperature below 85 F, the extremities may freeze and there is an increase in risk of irregular heart action.
TREATMENT
Aimed at re-warming body evenly and without delay. Provide heat with a hot water bottle, blankets, camp fire, or another person's body.
a. Send for help as soon as possible.
b. Protect casualty with dry clothing, move to a warm place.
c. Warm liquids may be given GRADUALLY.
d. Transport victim on a litter; activity may aggravate circulation problems.
e. Be alert for signs of shock. Be prepared to start basic life support measures.
f. Seek medical treatment immediately.
FOR SEVERE HYPOTHERMIA
1. Stabilize the temperature.
2. Attempt to avoid further heat loss.
3. Handle casualty gently.
4. Evacuate as soon as possible.
PREVENTION
a. Avoid rapid uncontrollable loss of body heat.
b. Be properly equipped and dressed.
c. Have a proper diet and sufficient rest.
FROSTBITE
- When crystals form in the skin or deeper tissues after exposure to temperatures 32 F or lower.
- Exposure time to produce frostbite varies with temperature, altitude, and wind velocity.
GENERAL
- Face and extremities most commonly affected.
- Classified as either superficial or deep, depending on extent of tissue involvement.
SYMPTONS
- Redness of skin
- Uncomfortable coldness, then numbness
- When ice crystals form, frozen extremities appear yellow-white or blue white, are cold
- Affected area hard, insensitive to touch
- Surface of skin is hard, but underlying tissue soft and can move over bony areas
- Only skin and tissue JUST BELOW it are involved
TREATMENT
a. Bring victim indoors, if possible
b. Hands: re-warm by placing under armpits, against abdomen, between legs. Cover with bare hands until sensation, color return
c. Feet: Re-warm by placing in armpits or against buddy's abdomen. Exercise toes to increase circulation
d. Gradually re-warm affected area by warm water immersion or skin contact (LAST RESORT when in the field)
DEEP FROSTBITE:
SYMPTONS
- Skin discoloration and tingling
- Frozen tissue may feel solid and look waxy
- Skin may become blue-black, large blisters may form (12 to 36 hours)
- Affects skin, DEEP TISSUE, BONE 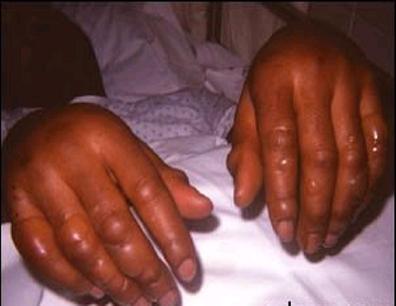
TREATMENT
- Administered ONLY by qualified personnel
- Objectives of treatment:
a. Protect frozen area from further injury by covering with blanket
b. Rapidly thaw affected area
c. Be prepared to respond to circulatory or respiratory difficulties
d. Transport victim to medical facility equipped for long term care
PRECAUTIONS
a. Constantly monitor victim's pulse, breathing
b. Respiratory, heart problems develop easily
c. Be ready to administer CPR
d. DO NOT attempt to thaw frostbitten area if possibility of re-freezing
WARNINGS
a. Re-freezing thawed area may cause severe and disabling damage
b. DO NOT allow victim to smoke or drink alcoholic beverages
c. DO NOT apply snow, grease, oil, or any other material to frostbitten area.
DO NOT rub, massage, or apply pressure to area.
PREVENTIVE MEASURES
a. Dress to protect yourself. In high winds, especially, protect face.
b. Keep clothing and body as dry as possible. Avoid overdressing. KEEP SOCKS AND FEET DRY!
c. In extremely low temperatures, DO NOT touch bare skin to metal.
d. Exercise exposed body parts frequently, and fingers and toes. Warm hands and ears to detect hard or numb areas.
e. Always use the buddy system. Watch each other's faces. Thaw frozen spots with bare hands or body heat.
f. Wear proper fitting clothing and equipment. Tight-fitting socks, boots, or gloves interfere with circulation and are DANGEROUS in very cold climates.
NOTE: Chilblains is another cold weather injury. Symptoms are red, swollen, hot, tender, itching skin. Continued exposure may lead to infected or bleeding skin lesions. Use body heat to re-warm. DO NOT rub or massage. Follow up with medical treatment if required.
COLD WEATHER DEHYDRATION
- Any type of dehydration is caused when the body loses too much fluid, salt, or minerals.
SYMPTONS
- Symptoms similar to those of heat exhaustion or heat cramps; most noticeable is profuse sweating
- Casualty may have nausea, dizziness, thirst
- May be weak and tired, muscles may cramp
TREATMENT
- Move casualty to shaded/sheltered area
- Have casualty drink one full canteen water
- Loosen casualty's clothing
- Seek medical assistance if symptoms persist.